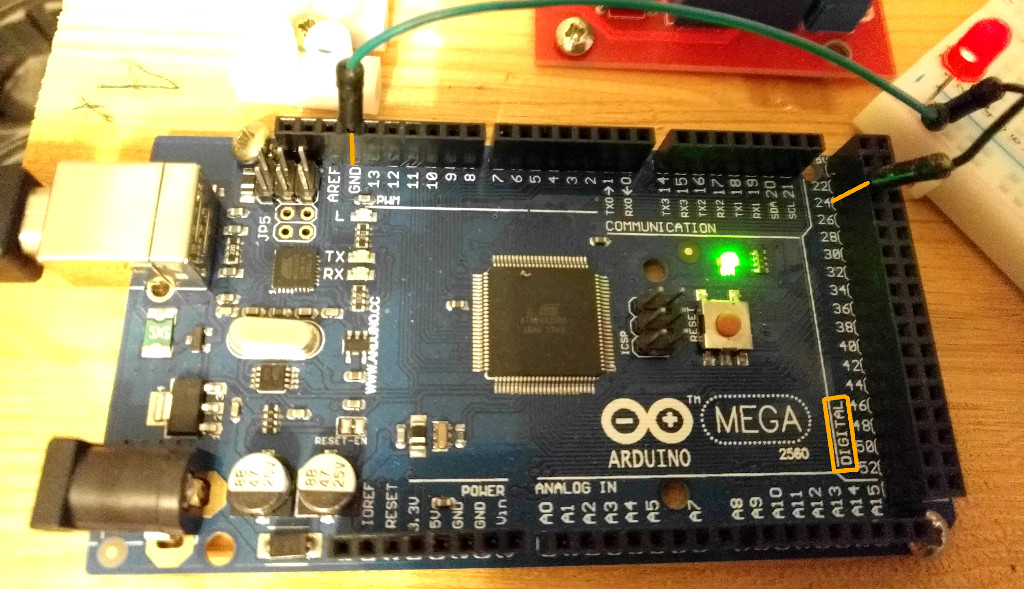
setup:
- get a Laptop/PC/VirtualMachine with Debian 9 64Bit and install Arduino IDE 64Bit for Linux
- one could use OSX, but sorry, no Windows is not an option X-D
- attach Arduino with a USB-Printer-Cable like here.
- might need to fix some access right problems of USB serial port /dev/ttyACM0
chmod a+rw /dev/ttyACM0
requirements:
- Arduino MEGA 2560 or similar (10 bucks on ebay)
- USB-printer-Cable
- a solderless breadboard
- an LED
- wire it up one pin to GND and one to DIGITAL PIN24
blinken_led_v1:
// this program will make LED blink in 50ms durations
// tested on: Arduino MEGA 2560
// setup: attach LED to Digital Port 24+GND

const int LEDdelay = 50; // in ms

void setup() {
  // put your setup code here, to run once:
  pinMode(24, OUTPUT); // define PIN 24 as output pin
}

void loop() {
  // put your main code here, to run repeatedly:
  digitalWrite(24, HIGH); // switch PIN 24 on/high/voltage
  delay(LEDdelay); // wait for x ms
  digitalWrite(24, LOW); // switch PIN 24 off/low/no voltage
  delay(LEDdelay); // wait for x ms
}
blinken_led_v2:
// about:     this program will make LED blink fast then slower and slower ;)
// tested on: Arduino MEGA 2560
// setup:     attach LED to Digital Port 24+GND

// put your setup code here, to run once:
void setup() {
  pinMode(24, OUTPUT); // define PIN 24 as output pin
}

// put your main code here, to run repeatedly:
void loop() {
  for(int i=0;i<300;){
    digitalWrite(24, HIGH); // switch PIN 24 on/high/voltage
    delay(i); // wait for x ms
    digitalWrite(24, LOW); // switch PIN 24 off/low/no voltage
    delay(i); // wait for x ms
    i=i+5;
  }
}
if the led is blinking:
congratulations! 🙂
if not: try to “turn LED around” (pull out LED and swap PINs), change polarization, change + to – .
if the led is blinking then:
congratulations! 🙂
other fun projects:
what kind of languages/programs run on Arduino?
the Arduino IDE is written in C/C++ (GitHub Repo)
https://en.wikipedia.org/wiki/Arduino_IDE
and the Arduino itself – being a very minimalist computer – is running C/C++ code.
“the Arduino language is merely a set of C/C++ functions that can be called from your code. Your sketch undergoes minor changes (e.g. automatic generation of function prototypes) and then is passed directly to a C/C++ compiler (avr-g++). All standard C and C++ constructs supported by avr-g++ should work in Arduino. For more details, see the page on the Arduino build process.”
https://www.arduino.cc/en/main/FAQ#toc13
online web based editor for Arduino:
control Minecraft: Pi Edition using a apples X-D
why? why not! X-D
https://learn.adafruit.com/capacitive-touch-sensors-on-the-raspberry-pi/overview

liked this article?
- only together we can create a truly free world
- plz support dwaves to keep it up & running!
- (yes the info on the internet is (mostly) free but beer is still not free (still have to work on that))
- really really hate advertisement
- contribute: whenever a solution was found, blog about it for others to find!
- talk about, recommend & link to this blog and articles
- thanks to all who contribute!


